There are number of differences and improvements to theme structure and the fallback system in Magento 2. The fallback system in M2 works in a similar way to Magento 1.x, but now has the added advantage of being able to create unlimited parent themes. In this tutorial, we will be creating a new theme based on M2’s “Blank” theme.
We’ll build theme file structure looks as follows:
app/design/frontend/Magebay/
 ├── default/
 │   ├── etc/
 │   │   ├── view.xml
 │   ├── media/
 │   │   ├── preview.jpg
 │   ├── web/
 │   │   ├── images/
 │   │   │   ├── logo.svg
 │   │   ├── css/
 │   │   │   ├── source/
 │   │   │   │   ├── _theme.less
 │   │   ├── fonts/
 │   │   ├── js/
 │   ├── registration.php
 │   ├── theme.xml
 │   ├── composer.json
<Vendor> is theme vendor. e.g: Magebay
<theme> is theme name. e.g: default
Creation of Magento 2 theme folder
app/design/frontend/<Vendor>/<theme>
Copy files theme.xml, registration.php, composer.json from vendor/magento/theme-frontend-blank
Declaration of theme
We’ll edit file theme.xml should look like this:
<theme xmlns:xsi="http://www.w3.org/2001/XMLSchema-instance" xsi:noNamespaceSchemaLocation="urn:magento:framework:Config/etc/theme.xsd">
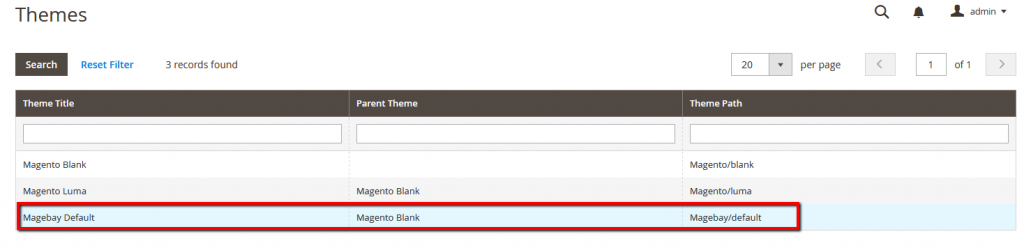
<title>Magebay Default</title><!-- your theme's name, what you see in backend -->
<parent>Magento/blank</parent><!-- the parent theme, in case your theme inherits from an existing theme -->
<media>
<preview_image>media/preview.jpg</preview_image><!-- the path to your theme's preview image, what you see on home page -->
</media>
</theme>
Make file preview.jpg update to your theme folder.
Developing composer package to distribute it
We’ll edit file composer.json should look like this:
{
     "name": "magento/theme-frontend-default",
     "description": "N/A",
     "config": {
         "sort-packages": true
     },
     "require": {
         "php": "~7.1.3||~7.2.0",
         "magento/framework": "102.0.",
         "magento/theme-frontend-blank": "100.3."
     },
     "type": "magento2-theme",
     "license": [
         "OSL-3.0",
         "AFL-3.0"
     ],
     "autoload": {
         "files": [
             "registration.php"
         ]
     },
     "version": "100.3.0"
 }
Register the theme
We’ll edit file registration.php should look like this:
<?php

use \Magento\Framework\Component\ComponentRegistrar;

ComponentRegistrar::register(ComponentRegistrar::THEME, 'frontend/Magebay/default', __DIR__);
We’ll be running Magento in developer mode. In developer mode, Magento’s much more strict about PHP errors, will display raw exceptions, and make it easier to develop modules.
Open command prompt and change directory to your magento install directory. Run the following command in command prompt:
php bin/magento deploy:mode:set developer
Now, we go to backend check our theme was complate register.

Creating statistic files and folders:
Create directories to store the static files: styles, fonts, JavaScript and images. Each type should be stored in a separate sub-directory web in your theme folder.
app/design/frontend/Magebay/default/
 ├── web/
 │ ├── css/
 │ │ ├── source/
 │ ├── fonts/
 │ ├── images/
 │ ├── js/
Configuring catalog product images
Copy files view.xml from vendor/magento/theme-frontend-blank/etc/ then edit it if you want. The properties of product images used on the storefront are stored in this file.
Declaring theme logo
If you have logo.svg file you can update to your theme folder it will auto override logo default of Magento.
Or you can change to different file format such as png, jpg but you have to declare it.
To declare a theme logo, add an extending default.xml to
<page xmlns:xsi="http://www.w3.org/2001/XMLSchema-instance" xsi:noNamespaceSchemaLocation="urn:magento:framework:View/Layout/etc/page_configuration.xsd">
    <body>
        <referenceBlock name="logo">
            <arguments>
                <argument name="logo_file" xsi:type="string">images/logo.png</argument>
                <argument name="logo_img_width" xsi:type="number">300</argument>
                <argument name="logo_img_height" xsi:type="number">300</argument>
            </arguments>
        </referenceBlock>
    </body>
</page>
Then you update file logo.png to <theme_dir>/web/images/
Apply we theme then see it on frontend
Go to backend > Content > Configuration then click edit to choose our theme
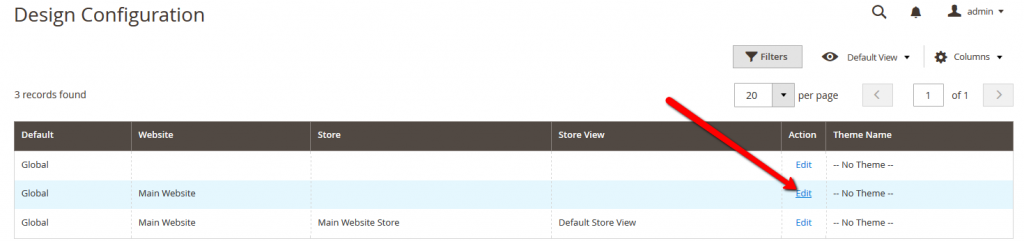

Now you can refesh cache then go to frontend see your changes applied. We have set up our theme and are ready to start customizing it!
For the next post we will Cover Customizing Layout Illustration Theme layout.